Drag and drop
This is one of the interactive exercises that will help you to organize the knowledge gained in the presentation, as well as improve your attractiveness.
It consists in placing specific elements scattered on our stage in places called "containers".
In the first stage of creating our presentation we have to start by creating moving items as well as the containers in which we will place our objects.

So prepared elements are already the absolute minimum of our exercise, of course, the definition of mobile elements is completely arbitrary and we decide
what we will use for the needs of our presentation colorful elements will be most readable.The next step is to add a background, and any color matching
as possible, as we can see our scene is largely empty. We will improve the look of it by adding several elements:
The background we will use when we have ready-made styles:

As you can see the colors of our items and containers do not look very attractive, let's adjust it to our background. we can use colol zilla plugin, using google
search we look for the best color schemes available for our background.

The color scheme is much better, but the container fields are not clear to solve this problem by adding a colorless text box to the boxes where we change
its transparency, rounding the corners to get an interesting effect - it looks like this:

We modify the properties of the text field by clicking on the object and thenIn the properties we use the gradient slider in this way by specifying
the degree of transparency.

The same window will be added to our mobile elements, and we will also include information that objects in the text box are moving objects.

Our scene is more attractive to make up for it by the way we can give instructions on our exercise. We go to the image library located in the panel on the left
side of the screen, select the "people" option and select the most appropriate character.

The last step with respect to the aesthetic side of our scene will be the addition of a button with which we will check our exercise as well as the "clouds" containing
the exercise instructions. The cloud will be found in the image library. The "check exercise" button is an ordinary text field that we use to determine the triggers
we are interested in our function.

As you can see the appearance of our scene is already more interesting, we will also use some animations, so that the objects to move will appear gradually with
a little delay, we will do it with a timeline, also a speech bubble with the expression of our character will appear with a little delay.

With these settings, the character will appear immediately after launching our presentation, while the speech bubble will appear in the first second, the command itself
will be visible after 1.5 seconds. In addition, we will use the available animations so that the balloon and the character will appear on the stage in the form of animation.

The animation window is located at the bottom right of the screen right next to the timeline, and we see a number of parameters that we can specify:
- object lifetime - determines how long the object will be visible on stage.
- enter delay - determines the moment when an object appears on the stage, it can also be determined by the appropriate timeline setting.
- object animation in, out, hover, and endless - defines how the animation is started, possible options include animation when an object appears on the scene, object exit,
object rollover, or last animation continuous.
Using this knowledge, the last change associated with the animation will be the change in when objects appear on the stage - we move all elements to the new layer.
It will be most convenient for us to do this by clicking on the items that interest us on the stage then clicking on right mouse button, we can move objects to the new layer.

It looks like this:

Now it is up to us to determine which of the elements will appear at a given moment.The first object visible on the stage will be our "frame", the next objects will be pairs
of squares to move appearing in 2,3,4, 5,6,7 seconds. The easiest way to determine which object is represented by a specific time line is to click on the particular object
- the corresponding time line will be highlighted. The effect of our work should look like this:

Also, let's add an animation to the appearance of elements on the stage, we can immediately select all the elements to move and assign them the same effect.
As you can see the text window itself, that is, our frame will have a separate animation - lightening.

The next stage is the proper configuration of the exercise. To do this, select from the left panel of the quiz book, move and drop on the stage you will receive a confirmation button.

With this button we set up our exercise: when you click on it and enter in the properties tab we will see:

The first section of our containers looks like this:

In it, we select the container objects and the appropriate objects assigned to the container data. We click on the viewfinder icon and objects placed on the stage are selected
by clicking on objects to be containers.

We see that our containers are highlighted in red, plus we see 4 sights next to 3 of them we see an icon with the letter T - each letter T means one container of their quantity
is optional to confirm the confirmation by clicking in the field visible at the top of the screen:
![]()
On the right side of the panel we see the same sights - we will define the objects that are moving for the container.

We repeat this operation three times because we use 3 containers. The exercise panel now looks like this:

The next tab "draggable anwsers" presents us all the objects that we mark as "mobile", invading each element we will see that the item is highlighted on the stage so we will
avoid mistakes. It looks like this:

The "settings" tab
The first option - set question contains:

- mark question - marking questions.
- wrong dropped ... - incorrectly placed objects will return to their place.
- turn on default feedback - option to enable or disable the message associated with a correctly solved exercise.
- disable object after good drop - option to block a moved object if it was placed correctly.
- second option - options for all containers contains
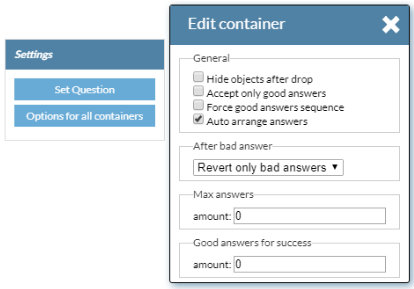
- Hide objects after drop - means to hide the object after placement.
- Accept only good anwsers - prevents placement of the wrong item in the container.
- Force good anwsers sequence - An option used when a specific order of placing the correct elements is also required.
- auto arrange anwsers -
- After bad anwser tab gives us the ability to determine the behavior of exercise elements - we have the choice of 3 possible behaviors:


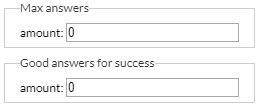
- In the window we can determine the maximum number of responses as well as the minimum number of points earned during the exercise.

Feedback settings allow us to determine the message that appears after the end of the exercise, whether or not the exercise was successful, or we can not determine
the content of the message.

Testing exercises
After running our exercise and moving our objects properly, we should see the following message:

In the event of an error we will see:

As you can see, the option to undelete an invalid response is active, so all the items that are wrongly placed are returned to their place.
The exercise was prepared properly the last step we want to present is a change of the button by which we will check our exercise. To do this, the "confirm" button
is moved out of the scene.

Then click on the exercise check button and use the triggers to select:
action - click, effect - check the exercise, press the confirm button so that our button will be able to check the exercise.
